Free, www.free.fr, is a French telecommunications company, subsidiary of Iliad that provides voice, video, data, and Internet telecommunications to consumers in France. It is the second-largest ISP in France.
Currently, the domain free.fr is blocked per our Security Team due to high risk of Spam/malware from the domain. The domain is in our Managed blocked domains list. However, we have several users based in France that must receive emails from customers that use free.fr email addresses.
Here is the workaround that we put together.
Before we started with the workaround, we used one of the many available DMARC checkers out there to check the status of DMARC for the domain free.fr.
As you can see, there is a DMARC record for free.fr but it is set to p=none. Ideally, you would want either p=quarantine or p=reject.
So, with that said, we want to set up an Exchange Transport Rule for Authenticated free.fr Senders as a workaround. Here is a screenshot of a sample Exchange Transport Rule on how you would set this up for free.fr Senders.
One of our Executive Assistants regularly sends email on behalf of the Executive that they support. The Executive Assistant has Send As permission for the Executive’s mailbox. When the Executive Assistant needs to send out an email for the Executive, they open a new email message in Outlook, select the drop down in the From field, and they enter the Executive’s name and finish composing the message.
Recently, the Executive Assistant (EA) contacted me saying that they could not longer send emails on behalf of the Executive. When the EA tried to send the email, the EA received a NDR with the following information in the body of the message.
Your message did not reach some or all of the intended recipients.
Subject: Test Message Sent: 9/1/2022 9:00 AM
The following recipient(s) cannot be reached:
<Recipient Name> on 9/1/2022 9:00 AM
This message could not be sent. Try sending the message again later, or contact your network administrator. You do not have the permission to send the message on behalf of the specified user. Error is [0x80070005-0x0004dc-0x000524]
After some extensive research and troubleshooting, I figured out that the entry for the Executive in the Executive Assistant’s Nickname (or AutoComplete) cache was corrupted.
Shortly thereafter, the Executive Assistant was able to send messages for the Executive again. Please note that the Executive Assistant had to pick the Executive’s name from the Global Address Book when composing a new note and to repopulate their Nickname (or AutoComplete) cache in Outlook.
A quick review first. Microsoft does not operate Office 365 in China. Office 365 operated by 21Vianet is designed to meet the needs for secure, reliable, and scalable cloud services in China. This service is powered by technology that Microsoft has licensed to 21Vianet. 21Vianet operates local Office 365 datacenters to provide customers the ability to use Office 365 services while keeping customer data within China.
So, with that said, one of the company domains we own is hosted in China. As a result, the company domain we own in China is seen as an external domain when we compose an email message in Outlook and the following Mail Tip pops up.
One of our Executives requested the MailTip to be turned off for the domain because it gives the appearance that the employees based in China are not recognized as internal employees. For example, when we send an email to another employee in our Office 365 Tenant, we do not get a MailTip stating that the recipient is outside of our organization.
So, we were asked to turn off the MailTip for employees based in China.
How do you turn off a MailTip for an external domain and ensure emails from the external domain are protected against phishers/spammers for our end users?
There are two things you need to do.
The first thing we did was to make sure DMARC/SPF/DKIM were in place for the external domain. Since we owned the domain, we were able to make the necessary changes. After making the changes, we validated that the external domain was protected against abuse as shown below using one of the many DMARC record checkers out there.
It is very important that the above is in place before you proceed with the PowerShell commands below. If you do not have this in place, it is highly recommended that you do not proceed any further until this is in place.
The second thing we did was we ran New-RemoteDomain -DomainName <xxxxxxxx> -Name <xxxxxxxx> in Exchange Online for the external domain.
Shortly thereafter, we ran Set-RemoteDomain -Identity <xxxxxxxx> -IsInternal $True. By running both PowerShell commands, we are telling Exchange Online that the domain should be treated as an internal domain.
After making the changes and waiting for replication to complete on the backend, we were able to confirm the MailTip no longer appears for newly composed messages for the domain we own in China.
One of our users remotely working from home encountered the following Trend Microsoft Check Warning message when they clicked on a link embedded in one of their email messages while using Outlook.
WARNING Scam website This website may be hosting scams Get Out of Here
We do not use Trend Micro as we use a different product. It took us quite a bit of time to figure it out so hopefully this article will help someone else resolve similar issues much more quickly than we did.
Since we do not use Trend Micro on company provided equipment, we were able to determine that Trend Micro was installed on the user’s local router as part of their ISP service for inspecting traffic on the user’s local home network.
The fix was to request the user to logon to our company’s VPN using their company provided equipment to access their email messages using Outlook so Trend Micro could not inspect the traffic. The user was no longer able to reproduce the issue from VPN.
One of our Executives tried to add a new delegate in Outlook by going to File > Account Settings > Delegate Access. When they clicked to add the delegate, a “The Delegates page is not available. Cannot access Outlook folder” message appears on the screen.
After researching the error message in Google, we tried the following to troubleshoot and resolve the issue.
We reviewed the Executive’s publicDelegates attribute in Active Directory Users and Computers.
We confirmed all listed Delegates were configured correctly and confirmed that there were no “ghost” delegates re: employees that left the company and their Active Directory account and mailbox were deleted successfully.
Reviewed permissions for the Executive’s Calendar using PowerShell.
We confirmed all the Delegate permissions were configured correctly and confirmed that there were no “ghost” delegates re: employees that left the company and their Active Directory account and mailbox were deleted successfully.
We configured a new temporary delegate in the manager’s mailbox by using Outlook Web App (OWA) to force updating of the local free/busy object. You can do a Google search to get the steps how to do this.
We used MFCMAPI to confirm there were no corrupted or hidden delegates.
In addition to the above, we tried several other things to no avail.
Several days later, I worked with the Executive’s local Desktop Support to remote control the Executive’s laptop and log into Outlook and review the client folder permissions for all the Executive’s mailbox folders. Long story short, we found several terminated employees that were set up as delegates for multiple folders in the Executive’s mailbox. Also, please note that these terminated employees did NOT show up in the Executive’s publicDelegates or Mailbox Folder permissions for the Calendar folder using PowerShell.
After we removed the terminated employees from the client folder permissions for multiple folders and logged out and logged back in Outlook, the Executive was able to successfully add a new delegate in Outlook.
Recently, we worked with our Information Security Team to ensure they receive emails reported as potential or suspicious phishing emails to their Exchange Online Shared mailbox (infosecurity@abc.com).
We created an Exchange Transport Rule that ensures all reported potential or suspicious phishing emails are sent to infosecurity@abc.com.
While we were testing the Exchange Transport Rule, our Security Team wanted to add some additional criteria to the rule to identify certain emails so they could copy them to their Level 2 Security mailbox infosecurityLevel2@abc.com so they could review the emails more quickly. They wanted all reported emails with the phrase [SUSPECTED PHISH] (all CAPS and in brackets) anywhere in the Subject line to be copied to their Level 2 mailbox.
While we were testing, we had some difficulty setting the Regex or regular expression in the transport rule because the phrase [SUSPECTED PHISH] could be anywhere in the Subject line (re: front, middle, back, by itself). After a lot of trial and error, we were able to successfully test the Regex for the Subject line requirement.
Here is the Regex expression for the phrase [SUSPECTED PHISH].
^*\[SUSPECTED PHISH\]$*
Using one of the many Regex Testers out there, we were able to validate the Regex as shown below.
After making the necessary changes in the transport rule, everything has been working as designed.
Lastly, if you need more information how to use a transport rule to copy messages to another mailbox, you can refer to the link below.
We currently have an Exchange Online Transport Rule where we block suspicious phishing domains. The rule works very well for us. In the last several months, we have noticed that phishers are using either Accents or Diacritics marks to mimic our primary email domains.
For example, our primary domain is @abcde.com. A Phisher uses abcdē.com.
Before proceeding further, please be aware that an Accent mark is a symbol used over letters, commonly vowels, to help emphasize the pronunciation of a word. Also, diacritics are marks placed above or below (or sometimes next to) a letter in a word to indicate a particular pronunciation.
Our Security Team requested several domain names with Accent marks to be blocked. The domain names with Accent marks requested were the same as our primary domains, so we wanted to do our due diligence before adding the domain names with Accent marks to our Exchange Online Transport Rule that we use to block suspicious phishing domains. We wanted to make sure that if we added the domains with Accent marks would not block emails sent to our primary domains.
We did some extensive research regarding the use of Accent or Diacritic marks for domain names in an Exchange Online Transport Rule, but we could not find any official Exchange Online documentation that states that their filters are able to recognize and distinguish between regular and accent/diacritic letters for a domain (or even an email address).
So, we did some preliminary testing where we tested sending email to one of our smaller domains. We sent multiple test emails to an email address with the accent mark and one without it. We were able to confirm that that Exchange Online Transport Rule was able to differentiate the two.
As a result, we went ahead and implemented this for the domains with accent marks that were the same as our primary domains. We have had this in place for several months now and there haven’t been any reported issues.
So, here is a screenshot of a public folder message regarding one of our Office 365 public folders in our environment. As you can see, the limit is 1 million messages.
We worked with a customer several months ago regarding one of their public folders that they were actively using as part of their customer application flows and the public folder owner was very concerned about hitting the public folder quota limit because they average between 3000 to 4000 new messages a day.
We worked with them to figure out far they needed to go back for historical and other purposes. The customer decided that they needed to be able to go back 90 days and they did not have time to clean out the public folder on a regular basis.
To meet the customer’s requirements, we decided to set the AgeLimit for the public folder.
We ran Get-PublicFolder “\Home\Public\Folder\1” | fl and confirmed the AgeLimit had not been set for the public folder.
After confirming the AgeLimit had not been set for the public folder, we ran Set-PublicFolder -Identity “\Home\Public\Folder\1” -AgeLimit 91.00:00:00 to set the AgeLimit to 90 days. Please note the number 91 was entered to ensure they could see 90 days of messages.
After setting the AgeLimit, we waited 24 hours to confirm it was working as designed. You can check by running Get-PublicFolderStatistics “\Home\Public\Folder\1” | fl and reviewing the DeletedItemCount and ItemCount attributes.
Additional Information
Please note if you hit the 1 million ItemCount as the following screenshot shows, the public folder will stop receiving new messages right away so please be aware of that especially if you have customer application flows that generate large numbers of messages on a daily basis.
Over the last several months, we have had several phishing email attacks. For the most part, we have been able to address them by simply removing the phish email messages from the user mailboxes. However, we had a recent phishing email attack where over 98% of the messages were quarantined which is both good and bad. The good being that the phish email messages did not make it to the user mailboxes. The bad being one or more users could potentially release the message from their user quarantine and the message gets delivered to their mailbox.
If you cannot wait for these messages to expire from the Hosted Quarantine and you have concerns with users intentionally or inadvertently releasing a phish email message from their user quarantine, then here are the steps how to remove phish email messages from the Quarantine so users cannot release them.
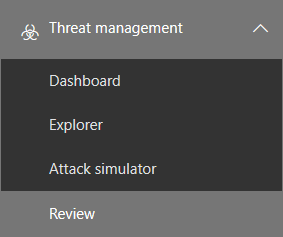
1) Log on to Office 365 | Security & Compliance
2) Tick Threat Management and Review
3) Click Quarantine
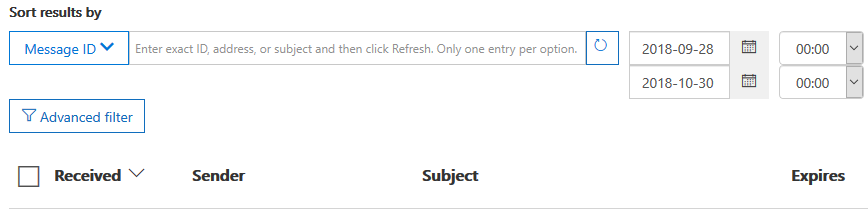
4) Under Sort results by, enter your Phish email criteria and dates
5) A list of results will be returned. Tick the Received box to select all messages
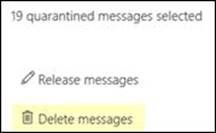
6) Click Delete Messages
7) Acknowledge the Warning message
8) To verify the messages have been removed from the Hosted Quarantine, repeat steps 4 and 5 and confirm no messages are returned in the query.
Recently, we whitelisted a Sender IP in Exchange Online to prevent messages from going into user’s Junk E-mail folders.
After adding the Sender IP to our whitelist, we checked the message logs and confirmed that messages were no longer being marked as Spam and were being delivered successfully to user mailboxes.
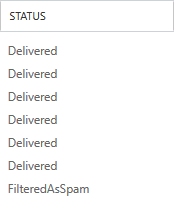
However, we noticed messages for one of our users were still being marked as Spam. In the message logs, we could see the messages were being marked as FilteredAsSpam.
We confirmed the messages were coming from the Sender IP that we whitelisted so they should have not been marked as Spam.
After some troubleshooting, we learned the user inadvertently added the From: Sender IP email address to their Outlook Blocked Senders list which was causing the messages to go to the Junk E-mail folder.
After removing the email address from the Blocked Senders list, we confirmed messages were no longer being marked as Spam and getting delivered to the user’s mailbox.